
The field of computer graphics is developing very fast. The wording is becoming more and more complex, leading to misunderstandings in technical discussions among architects and other rendering enthusiasts. We want to explain the most important, recent concepts so that you can get the most out of your architecture designs.
General Explanations
Rendering
The term “rendering” describes an artificially generated image, unlike a photograph. It does not describe the process behind it, or the quality. The common question “Is this image truly rendered?” to describe the quality of a rendering hence does not make sense. If someone describes an image as rendered, the only contained information is that the image is not a real photo.
Resolution
To save images on a computer, we have to tile them into little pixels. The resolution does only describe the amount of pixels in the image, not the quality, sharpness or anything else. Even if you have a high-resolution rendering, it can still look edgy and unrealistic.
Real time vs. Offline
The generation of an image can last up to days (Offline) or down to milliseconds (Real time). We call a process real time, if it enables you as a user to interact with it without waiting for the result. This is usually possible if the image appears in less than 50 ms which equals more than 20 frames per second.
The timescale between a real time and an offline rendering varies in magnitudes of scale. In contrast, the resulting image does not have to do so. The techniques used to create those images are fundamentally different – an offline image that takes hours is not just a real time image with a lot more time. Generally, you can achieve the highest quality by using offline rendering and investing some time. However, the quality gap between the fast techniques applied in real time rendering and old-school offline rendering is getting smaller, thanks to advances in software research and faster end-user hardware in your computer.
Imagine it as the difference between early digital photography compared to classic film. The underlying process is different, yet it achieves the same effect with different frameworks. With advancing digital photography, the benefit of shooting with true film almost vanishes.
Ray-tracing
To create a rendering, you can assume that the light consists of little particles moving along a ray. In order to simulate this, we are using ray-tracing. Ray tracing is commonly associated with offline rendering, because it is computationally complex. However in modern real time renderers (e.g. like Enscape), we already using ray-tracing for some of the calculations.
Technique Descriptions
(Anti) Aliasing
We want to mimic images from a camera: a photograph. Even a digital photograph consists of pixels. Every pixel on a real photograph describes the average light that hits the sensor over the whole area of this certain pixel (really small – but still an area, not an infinite small point!). Now, if a pixel covers the area where – let’s say – a black wall stands in front of a white background, the pixel would not be purely black or white, it would be gray. This leads to a naturally smooth image.
An aliased border, without proper anti aliasing
An anti-aliased border, as photographed with a real camera
In computer graphics, we are sometimes tempted to treat a pixel like a single very small point. This makes our gray wall transition pixel either black or white. We do so, because it makes many computations faster, but it creates an unpleasant effect: aliasing.
In order to counteract this outcome, there are a variety of techniques available. Some of them, like e.g. FXAA employ a smart blur filter. Unfortunately, blurring the image does not solve flickering, even if every image itself is “blurred” correctly . The only reliable solution is to render the image at a higher resolution (still aliased) and then to scale it down. We call this super sampling (the way to go, if you have a lot of time) or in a variant multi sampling.
Solution for real time graphics
In current realtime graphics, the computational demand of a super sampled image is temporally divided. The software recycles the last video or animation image while adding new information about the edges image after image. It is called temporal anti aliasing and can make your image a bit blurry or noisy in motion. At least if you have a stationary camera position, the image becomes very sharp and crisp within a fracture of a second.
Physically based rendering
While developing a software that creates a rendering, you have to tell the computer what it should do – in every detail. This includes the question of how the light behaves (without light we would only have a black screen). You can quickly come up with a few basic observations: The light particle is reflected or absorbed if it hits something. It then bounces through the scene, creating shadows and colorful imagery. Until a few years ago, it was still usual to rely on simple assumptions: One part of the light spreads evenly (the diffuse part) and the other one forms a glossy or rough highlight (the specular part).
These observations are not inappropriate, however this is not exactly how nature behaves. The term physically based rendering describes the effort of replicating the real world material interaction with light as close as possible. It turns out that the way a light particle bounces across a surface is strongly angle-dependent. This is based on special scans, where scientists measured the behavior of light on materials under special lighting conditions. Considering those exact measurements, we can now design more complex simulations in order to match the light properties of real world materials, without too many simplifications.
The visual impact of using physically based materials can be little – but leads to an overall coherent and consistent look.
Unbiased rendering
Given your set of materials, lights and your whole scene, mathematics tell us exactly how your image should look. Just like in nature, there is only one sort of visible light and we expect a certain behavior of it. The behavior of light is mathematically described.
If you want to create a truly correct simulation of the light in your image, it might take a long computation time. By obeying the mathematical rules of light, you are then creating an unbiased rendering. However, if you allow an almost invisible difference in image quality (the bias) – the computational process can be a lot faster. The challenge for us developers is to keep the visual bias very low while increasing the speed we get from accepting this bias in our image.
Note that you can create an unbiased rendered image, which is totally aligned with the laws of light without using physically grounded materials.
Global Illumination
If the light hits a surface, it does not end there. For example, in indoor environments, you have areas in your building, which are not illuminated by artificial light and have no direct sight to the bright sky or the sun. However they are not completely dark. They receive the light bounced from other surfaces.
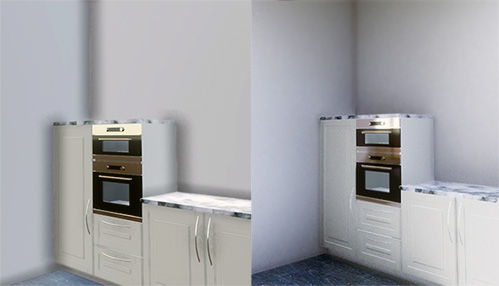
Left: Global Illumination, Right: Only direct light. Compare the light on the ceiling and the reflections on the ground.
These bounces make the lighting not local anymore – it is global. The classic computer game look of the first 3D games emerges from a constant brightness instead of a global illumination depending on the scene geometry. Enscape for example calculates multiple light bounces in real time to simulate the indirect light even in indoor environments.
Auto Exposure
A camera has a limited range of brightness values that it can capture. For example, if you adjust your camera to allows you to see all the details in a dark room, you would see only a plain white image if you now point the camera in broad daylight. The reason for this, is that the potential brightness range in real scenes is much larger than our eyes and a camera can capture. That’s why your eyes have a flexible pupil diameter and a camera has a shutter. At Enscape, we replicate that to make the image look like a photography.
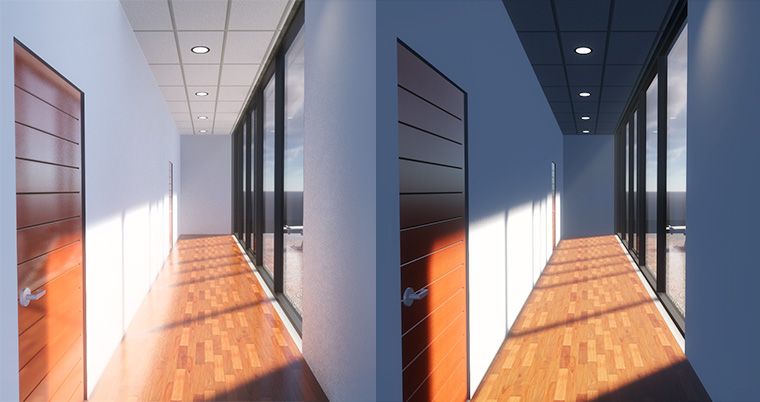
Finding the right exposure is sometimes not trivial. You can of course set the exposure manually (similar to what happens if you use your camera app at your smartphone and tap somewhere on the screen) but that would require a manual readjustment if you move from inside of a building to the sunny outside. That’s why there’s something called auto exposure: The exposure is automatically calculated to ensure a right exposure for most of the screen. If most of the screen is very bright due to the sun, it may happen that darker parts of the screen including weak artificial lights seem to disappear because they are underexposed. Keep in mind that real sun light is magnitudes brighter than most artificial indoor light.

Left: Sunny day, exposure set to correctly capture the outside. Inside looks too dark. Center: Sunny day, exposure set to correctly capture the inside, the outside looks too bright. Right: Clouds adjusted to simulate a cloudy day, now the outside is not as bright anymore. The camera is now able to capture the indoor lighting and outdoor lighting situation without over brightening or darkening.
Ambient Occlusion
Recall the above paragraph about unbiased rendering. Sometimes you have to agree on some limitations to make it non-physical, but faster. That is why graphic developers invented Ambient Occlusion.
Due to the complex phenomena of light bouncing on different surfaces, occluded corners sometimes become a bit darker. This is often the case, but if you look at the corners in the room you are sitting in, you might notice that there is sometimes no darkening at edges at all.
Anyway, it is a common technique to imitate a correct global illumination calculation. The rendering software darkens areas where anything might be in the way of approaching light. This is not very very close to “real” and does not represent the natural properties of light. Yet it enables the viewer to grasp easily the geometric appearance of the scene. Then again, it sometimes looks like some dirt in the corners or even creates images that appear too dark. Screen Space Ambient Occlusion (SSAO) is an even rougher approximation of the normal ambient occlusion. It only considers occlusion from objects inside of your current screen.
Left: Ambient Occlusion, Right: Global Illumination. Note the varying occlusion radius with regard to the scene lighting environment
An unbiased rendering software does not use ambient occlusion, neither do we at Enscape (only if you disable the global illumination). We obtain the effect of naturally appearing darkened corners thanks to the multiple light bounces.
Conclusion
Hopefully this article will contribute to a better understanding of a few important graphic buzzwords. If you do not know Enscape already, then try it now! Enscape is our Revit plugin for realtime renderings at a very high quality level. You simply walk through your architectural project based on the CAD planning data – no export, import or tuning needed! If you liked this post or have any comments, please send us a mail. Thank you!